Windows 7 Owners, You Want To Do This…
Congratulations! You bought yourself a new multi-core PC and it has the new Windows 7. Or, you just purchased a specially-discounted Win7 upgrade “pack” (see, Super Discounted Windows 7 – Limited Time) and brought your older computer(s) up to date with Microsoft’s latest, and arguably best, operating system.
I know you are probably busy exploring Windows 7’s features, customizing this, and tweaking that, installing your favorite games (um.. er.. I mean “programs“. Ahem) etc., etc., but please, before you do anything else, do this:
1) Find the discs that came with the computer.
Do you see a “Windows 7” or “System Recovery” disc? No? Not surprising. Most manufacturers are using a recovery partition these days (saving maybe 4¢ on the cost of a disc.. more like 1/2¢). Well the plain and simple fact is — you want a disc.
Why? Because the discs are “bootable”, and can allow you to repair machines that will not otherwise boot (aka “start up”). If you ever run into such trouble, you can boot to the disc; which includes an automated boot-repair tool, some repair/diagnostic tools, and the ability to access a System Restore point and revert your system to an earlier (working) time. (see, My favorite Life Saver flavor? System Restore).
[note: The “recovery partition” option wipes your hard drive, and reverts the machine to the factory-condition state –> total data loss. All your updates and installed programs — gone. Thanks, manufacturers! *]
So you have a partition and not a disc. Remedy that now. All you need is a blank CD or DVD.
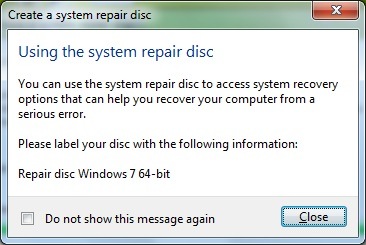
2) Click the Start button and type repair into the Search box. The top result is what you want to click – “Create a System Repair Disc”.

3) Your optical drive should be detected (if not, use the ‘drop-down arrow’ to select your CD/DVD drive). Click “Create disc”.

The drive tray should open, so put in your blank disc…

After a few moments, the tray should open (“eject”) and you will now have a “bootable” System Recovery disc…
.. and a powerful tool for repairing your computer in the event of serious errors. You need to make this disc BEFORE you need it.. though I hope you never will.
In case I wasn’t clear: do it now.
Kudos to Microsoft for making this tool a part of Windows.
* Utter, snide, facetiousness. A terrible move; and whoever decided that should be ashamed. And fired. IMHO.
Copyright 2007-2010 © “Tech Paul” (Paul Eckstrom). All Rights Reserved.
>> Folks, don’t miss an article! To get Tech – for Everyone articles delivered to your e-mail Inbox, click here, or to subscribe in your RSS reader, click here. <<
| Share this post : |  |
 |
 |
 |
 |
 |
 |
 |
 |
 |
22 Comments »
Post your Comment/Question
• About Tech Paul
 I am a Retired computer & network technician. I used to think the machines were pretty cool. Now I don’t.
They’re anything but.
I regularly posted how-to’s and tricks & tips and general computing advice here starting in 2007. (Use the Search tool to find answers. But be aware, many are rather dated.) Sometimes I answered (your) specific questions in an article if I believed the answer was generally helpful to “everyone”. All the writing you see was my own, typos and all. There always is/was an implied “IMHO” in what you see here.
Note: You are responsible for using this blog and its content. I am in no way liable for any losses caused by user error, viruses and/or other malware, hardware or software failure, or any other conceivable reason.
-
Say "thank you!" Buy Tech Paul a cup of coffee (and keep T4E ad free).

-

-

McAfee® Cybersafety Resource Portal, an online help center designed to assist victims of computer crime and provide information on how to avoid becoming a victim.
-


 Subscribe to Tech--for Everyone by Email
Recent Comments
-

-


-
-
Also:

-
-


Hey Paul,
Nice article and a worthy tip. I’ve come across many people regarding pc boot-up problems who don’t have installation or recovery disc and scratching their head for solution.
This can save you a lot of trouble when your pc doesn’t boot up even instead of running around for disc or contacting the vendor for support which may not be free..
Along with the creation of repair disc, i’d also create a system image so that i can easily boot off with the recovery disc and restore the image eliminating lots of hassle in case of any trouble.
LikeLike
Ranjan,
Thank you.
Yes, I quite agree.. in particular about creating an “image” (aka “ghost”) backup — which Vista and Windows 7 makes easy via the Backup and Recovery utility.
I have written many times about backups (real ratings killers, those) but it is my intention to do a step-by-step illustrated tutorial soon.
LikeLike
Cool. Looking forward to it.
LikeLike
Ranjan,
Well, it should be “a quickie” article, as Microsoft has made it pretty much 1-click simply…
.. and Windows 7 “nags” you to do it.
Does anybody, though? I doubt it.
(I meant, a ridiculously, pathetically small percentage do. The world we live in.)
LikeLike
Thanks Paul. Should come in handy when I buy my new laptop soon.
Grr
LikeLike
Grr,
Hopefully your laptop will come with the disc. But if not, making one should be an early priority!
LikeLike
Yes Paul.
But strange thing is that most of the laptops are not accompanied with recovery CD/DVD..
Usually Dell used to, but now even they have stopped. Now they charge for recovery DVD.
LikeLike
Hi Paul,
Great article.
But I have a problem. My notebook does not have a CD/DVD drive and as I have no need for one, I do not intend to buy one.
How can I create a System Repair/Recovery “Disc” on a USB thumb drive?
Thanks for your help.
jbe
LikeLike
jbe,
Great question. What is the workaround?
Unfortunately, I don’t think the utility has the option of creating a “disc image” (.iso) and letting you Save it somewhere. (So it probably doesn’t have the ability..)
In which case the trick would be not so tricky..
I think you will need access to another machine..
One thing in your favor, I don’t believe the discs are “product key” – specific for repair purposes, so if you can borrow an appropriate disc (either 32 or 64 bit), and have access to a machine with an optical drive, you could then use a burning program to “Copy” the disc to an ISO file (such as Nero, or Alex Feinman’s free ISORecorder, and then use an archiving tool like 7Zip to ‘extract’ the files from the ISO and copy them to the root of the thumb drive.
If you cannot borrow a disc, (and the use of a machine) you might be able to borrow an “external” (USB) CD/DVD drive.. use that to create a disc, and then do the above steps…
But, other than that, I’m out of ideas. If someone else would like to weigh in…
LikeLike
All right then, will go give this a try.
Thanks again.
jbe
LikeLike
jbe,
Maybe look at http://www.intowindows.com/how-to-create-bootable-windows-7-vista-or-xp-usb-flashpen-drive-with-a-single-click-must-try/
(I would try my way with the ISO first, though.. )
LikeLike
Sorry for the rather late reply.
Finally found some time to go get myself a 2GB USB drive. But instead of the link you gave above, I followed these instructions: http://www.intowindows.com/how-to-repair-windows-7-from-usb-flash-drive-repair-without-installation-dvd-disc/
Glad to report, it works just great.
Now I’m not so worried about a major crash of my notebook.
Thanks again,
jbe.
LikeLike
jbe,
Thanks for the update.
Your IntoWindos.com tip involves the command line, which novice users might not be comfortable with. But careful reading, and conscientious following of the steps is in fact the preferred method.
It simply is – IMHO – a ‘must have’.
(And it has to be done ahead of time (aka “now”)).
LikeLike
Paul & Jbe, thanks for the links.
Useful for me.
Thanks,
Grr
LikeLike
My computer came with a repair partition and when looking around on it I came across the “burn a recovery disc just incase” option. I have no idea what-all the recovery disc holds but it came in at over 10GB (I was provided with the 3 writable DVDs needed).
Incidently, I was warned that ANY alteration of the initial partition set-up would make the recovery partition unaccessable.
LikeLike
sunovawot,
Typically, that option makes a copy of the recovery partition. Using those discs will do the same thing as “Press F12 to Restore your computer” does.. namely, wipe the drive and put a factory image on.
It is not the same thing as the disc discussed in this article.
PS — technically speaking, that last bit is untrue. But it is easy enough – especially for those who don’t understand boot sectors, partition tables, the MFT & MBR, etc. – to make happen. Amateurs and novices should not fiddle.
LikeLike
Oops, my mistake, checking in the cupboard where I keep such things I find I have made repair disc for my computer. I had completely forgotten about it, thanks for reminding me!
sunovawot
LikeLike
sunovawot,
While that was not exactly the purpose I had in mind when I sat down and started writing the article.. I am glad I was able to ‘help’ you.
And it gladdens me to know that someone out there has made the disc. I hope you never need to use it.
LikeLike
The disc came into play last night when I got BSODed. Long story short in the end I used the repair disc to get the computer to reinstall from the recovery partition and loaded a week old system image. All that’s left to do now is to restore some files from yesterday’s backup.
Definitely a timely reminder. Thanks again.
LikeLike
sunovawot,
Thank you for sharing your “RL” story. I hope it will help motivate folks to get proactive, and take steps to protect their data.
(Because when us Geeks say “data”, we mean your photographs, tax records, address book, expensive iTunes library…)
The disc provides several tools for helping you recover from serious errors (frequently less painfully than a full system re-Install). You need it available before the blue-screen-of-death occurs. Make it today, won’t you?
LikeLike
TechPaul,
First, great walk through on this… Second, this should be one of the first things people should do when they get their PCs.
Rick
LikeLike
Rick,
Somehow.. inexplicably, I failed to see/reply to this – sorry!
Your support is always greatly appreciated here.
LikeLike