Changes+kids and the Internet+User Accounts
Loyal Readers,
Tomorrow, very bright and early, I will be doing something I really don’t like to do (and I mean really)– I will board a plane and fly clear across the nation. I am blessed with the opportunity to visit with my niece and nephew, and so I shall just overcome my fear of flying.
Upon arrival there, I will continue to write, six days a week, articles and provide the daily free download links as usual, but the timings of postings may be different and most likely nothing will appear tomorrow. There is much preparation to accomplish today, and so today I must repost a previously article: Part 1 of a series I wrote on keeping your children safe on the Internet– which appeared July 27th.
When considering how I wanted to approach this important topic, I started to feel a bit overwhelmed. I began to think that the best policy was to put up an Internet Age Limit — no one under 18 allowed. For all that’s marvelous about the Web, there’s also creeps and pedophiles lurking. There’s hardcore pornography. There’s build-your-own-bomb how-to’s. There’s poisoned sites ready to turn your machine into a spambot zombie that rely on naive clicking (“Download this cool Transformers screensaver..!”). There’s depictions of violence and crude language …
Yes. I think that’s the answer. No surfing until you’re 18.
Tip(s) of the day: Take these steps to reduce the risks of the Internet. I am going to offer you some guidelines and practical advice, and since this is such a complex and important topic, I’m going to stretch it over a series of posts. I hope that you will take (and apply) what you can use, and maybe pass this information along to your friends who have kids. And please notice that I used the word “reduce”; I cannot tell you a 100% iron-clad, never-fails method for stopping all the bad possibilities of life. I wish I could.
Step 1: Give your child their own User-level user account and crank up all the security settings. While this may seem counterintuitive, I assure you that you will have full access to their account from your own, administrator-level account. (I discussed User Accounts in a previous article, click here to view.) By having your child run as a User, they will not have the administrative privileges required to undo some of the restrictions you’re going to put into place. A side benefit is any malware that tries to install itself onto your machine will not have the authority to run, and thus it’s foiled (Curses! Foiled again!). Let’s face the facts: kids are more computer savvy than we are, so we need to reduce their ability to tweak and change the machine’s settings.
To create a new account for your kids, click Start >Control Panel >User Accounts.
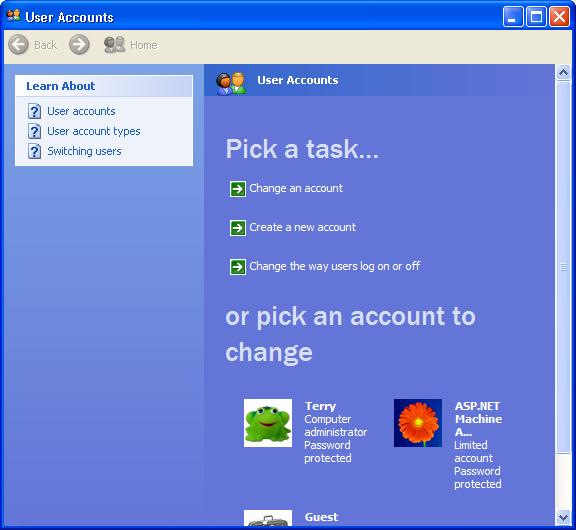
Click on “Create an account”, and give your new account a user name. For purposes of illustration, I’m pretending that I have a Tech Paul Jr. and his name is “Charlie” (I’m also pretending he’s a handsome little devil, and smart as a whip).
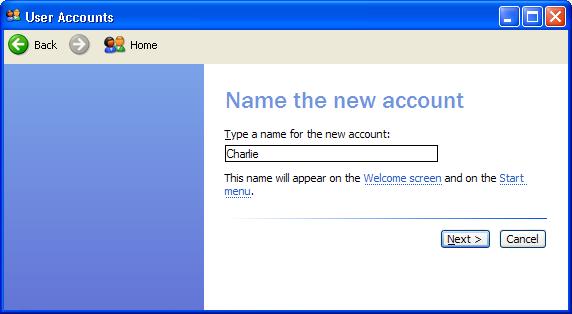
Now click next and accept the defaults. We’re going to use administrator privileges to install our security precautions, and when we’re finished we’ll come back and change it to user-level. Click “Create account”.
This will create an Administrator account named Charlie and return us to the User Account welcome page. Minimize this window, and log off your current account and onto your child’s new user account by clicking Start >Log Off, and either typing (Charlie, in my example) into the account box or clicking on their icon. There is no password yet. We’re now ready for the next step.
Step 2: Locking down IE. Now that we’re in “Charlie’s” account, launch IE. When it opens, click on the down-arrow of the Tools menu and select “Internet Options” and then click on the Security tab. Click on the Internet zone’s globe icon and click on the “Custom level” button.
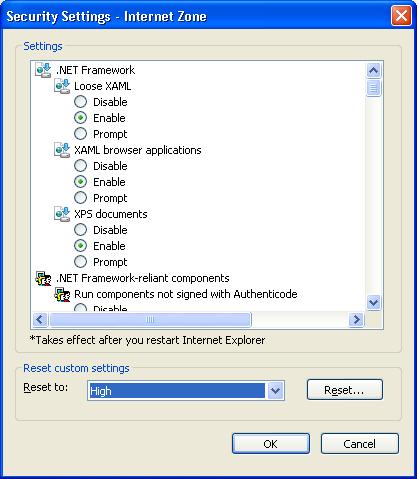
By default the over-all security setting for this zone is “Medium-high”. Use the down-arrow to set it to “High” as shown above, and hit the “Reset…” button. Should this prove too restrictive, you can come back and reset it to “Medium-high” at a later date.
Now click on the Privacy tab and make sure the slider is set to High and that the pop-up blocker is checked, as shown below, and click Apply (if necessary).

We’re just about through, but the next action is to click on the Content tab. Enable the Content Advisor by clicking the “Enable” button. A window will open that will show a list of the types of content you can limit. Your choice for each category — using the slider — is None, Limited, and Allow. Go through the list (click on each item in the list) and set it to your desired restrictions … they don’t have to all be the same. The age of your child may influence your decision as to which “level” you want to permit. In the example below, I am completely restricting (a “None” level) sexual material. Click “Apply” when you’ve made your changes.

If you want, you can return to the Security tab and add specific sites — My Space, for instance — to the Restricted Sites zone. This will prevent those sites, period, regardless of their content or rating.
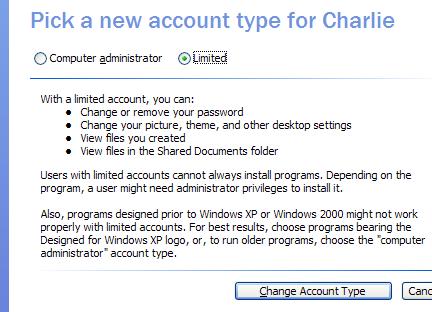
Now we need to log off “Charlie’s” account and back onto our own (steps described above), and maximize the User Accounts welcome window again (or Start >Control Panel >User Accounts) and this time we select “Change an account”.
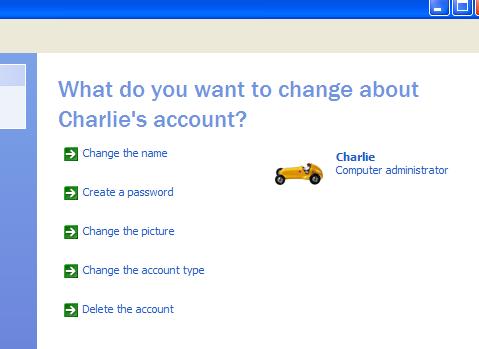
We want to change several things — we want to create a password, and change the account type from Administrator to Limited. Click on the Limited radio button and click the Change account type button.
I know we covered a lot of ground today, but I feel much better knowing Charlie’s web surfing has the proper boundaries in place … and that he cannot go in and undo all my hard work. There’s more we can do, which I will cover as this series continues. I am too worn out to post a free link today.
If you found this tutorial informative and useful, please, tell your friends. Comments are always welcome.
Click here to view Part 2.
Click here to view Part 3.
And here to view Part 4.
Copyright © 2007 Tech Paul. All rights reserved.
| Share this post : |  |
 |
 |
 |
 |
 |
 |
 |
 |
 |
 |
 |
• About Tech Paul
 I am a Retired computer & network technician. I used to think the machines were pretty cool. Now I don’t.
They’re anything but.
I regularly posted how-to’s and tricks & tips and general computing advice here starting in 2007. (Use the Search tool to find answers. But be aware, many are rather dated.) Sometimes I answered (your) specific questions in an article if I believed the answer was generally helpful to “everyone”. All the writing you see was my own, typos and all. There always is/was an implied “IMHO” in what you see here.
Note: You are responsible for using this blog and its content. I am in no way liable for any losses caused by user error, viruses and/or other malware, hardware or software failure, or any other conceivable reason.
-
Say "thank you!" Buy Tech Paul a cup of coffee (and keep T4E ad free).

-

-

McAfee® Cybersafety Resource Portal, an online help center designed to assist victims of computer crime and provide information on how to avoid becoming a victim.
-


 Subscribe to Tech--for Everyone by Email
Recent Comments
-

-


-
-
Also:

-
-


