Don’t Want IE 9? How To Turn Off The Update Nag
For those of you not ready to switch to IE 9, or want to go back to IE 8, this article (written back when Microsoft was moving us from IE 7 to IE 8) tells you what you need to know.. I simply updated it by changing the number!
IE 8 9 is an “Important” Update, Yes, But I Don’t Want It
Sometimes we need to tell Windows Update to stop prompting us to install a particular Update.

When Microsoft has released important and/or critical Updates (aka “patches”) for us, Windows has various ways of letting us know, including a System Tray icon. [note: The normal route for accessing Update choices is Start >Windows Update, or Start >Programs >Windows Update. Click “View available updates”.]
I am a big fan of Updates. I (almost) always install them the moment I become aware of them. I use Secunia’s Personal Software Inspector to keep an eye on all my installed programs’ update state.. and I recommend you do too. Updates are ‘good’ and you want them.
Tip of the day: Manage Windows Updates prompts.
Currently, Microsoft Update is annoying me by continuously nagging me that there are Updates available. And when I click on the icon to see just what these updates are…

.. and I see that there is just one Update Microsoft wants me to install (the others only rate “optional”) — Internet Explorer 8 9.
Now, I understand why Microsoft wants us to be using a more secure browser (and I understand why it’s considered “important”) and I will upgrade from IE7 8 on most of my machines — but not all. Not yet.
So I right-click on the Update I don’t want to be nagged about and then click on “Hide update”.
That’s it. I’m done. Windows Update will no longer prompt me to install this (now) ‘hidden’ update. At a later date, to see Updates that I’ve hidden, I just click on “Show hidden updates”. I can undo my change.
Note: This technique can be used on any Update — such as troublesome Updates that cause incompatibility issues, such as a BSOD. If a Windows Update install causes you trouble, and you need to uninstall it, the “Hide” tip won’t help you (it’s too late). Please refer to the 3rd answer in this article, IE’s Menu bar, Taskbar icons, and bad Updates*, to see how to remove Updates.
After you get that Update uninstalled, (then) use the Hide feature to prevent Windows Update from re-Installing it on you again.
To uninstall IE 8 9: Uninstalling IE 8 9 will automatically restore your older version (IE 8). Please see Microsoft’s official How To, here, How do I uninstall or remove Internet Explorer 8? How do I install or uninstall Internet Explorer 9?
Today’s free download(s):
* Panda Cloud Antivirus Panda Security has a ‘new’ type of antivirus – Internet based. “FREE, antivirus service for consumers which is able to process and block malware more efficiently than locally installed signature-based products.”
[For more, also see Panda Cloud Antivirus – Is it netbook ready?]
* Adeona is the first Open Source system for tracking the location of your lost or stolen laptop that does not rely on a proprietary, central service. This means that you can install Adeona on your laptop and go.
Today’s quotable quote: “You can observe a lot just by watching.” ~ Yogi Berra
Copyright 2007-2011 © “Tech Paul” (Paul Eckstrom). All Rights Reserved.
>> Folks, don’t miss an article! To get Tech – for Everyone articles delivered to your e-mail Inbox, click here, or to subscribe in your RSS reader, click here. <<
Do Not Want That Update? How To Stop A Nag
IE 8 is an “Important” Update, Yes, But I Don’t Want It
Sometimes we need to tell Windows Update to stop prompting us to install a particular Update.
When Microsoft has released important and/or critical Updates (aka “patches”) for us, Windows has various ways of letting us know, including a System Tray icon. [note: The normal route for accessing Update choices is Start >Windows Update, or Start >Programs >Windows Update. Click “View available updates”.]
I am a big fan of Updates. I (almost) always install them the moment I become aware of them. I use Secunia’s Personal Software Inspector to keep an eye on all my installed programs’ update state.. and I recommend you do too. Updates are ‘good’ and you want them.
Tip of the day: Manage Windows Updates prompts.
Currently, Microsoft Update is annoying me by continuously nagging me that there are Updates available. And when I click on the icon to see just what these updates are…
.. and I see that there is just one Update Microsoft wants me to install (the others only rate “optional”) — Internet Explorer 8.
Now, I understand why Microsoft wants us to be using a more secure browser (and I understand why it’s considered “important”) and I will upgrade from IE7 on most of my machines — but not all. Not yet.
So I right-click on the Update I don’t want to be nagged about and then click on “Hide update”.
That’s it. I’m done. Windows Update will no longer prompt me to install this (now) ‘hidden’ update. At a later date, to see Updates that I’ve hidden, I just click on “Show hidden updates”. I can undo my change.
Note: This technique can be used on troublesome Updates that cause incompatibility issues such as BSOD. If a Windows Update install causes you trouble, and you need to uninstall it, the “Hide” tip won’t help you (it’s too late). Please refer to the 3rd answer in this article, IE’s Menu bar, Taskbar icons, and bad Updates*, to see how to remove Updates.
After you get that Update uninstalled, (then) use the Hide feature to prevent Windows Update from re-Installing it on you again.
Today’s free link(s): Panda Cloud Antivirus – Free Cloud Protection
Panda Security has launched a brand new type of antivirus, and Security blogger Bill Mullins has this excellent write up. “FREE, antivirus thin-client service for consumers which is able to process and block malware more efficiently than locally installed signature-based products.” Click the link for more..
[update: For more, also see Panda Cloud Antivirus – Is it netbook ready?]
Today’s free download: Adeona is the first Open Source system for tracking the location of your lost or stolen laptop that does not rely on a proprietary, central service. This means that you can install Adeona on your laptop and go.
Copyright 2007-9 © Tech Paul. All rights reserved. post to jaanix
| Share this post : |  |
 |
 |
 |
 |
 |
 |
 |
 |
 |
 |
How To Play Online At Work
 Don Reisinger over at C/Net writes, “We all spend some of our time at work doing things that have nothing to do with our job. We surf the Web. We play games. Sure, we all need our downtime, and the enlightened manager knows that. But still, we’d rather just surf in private than deal with the raised eyebrows.
That’s why we need ways to ensure that when our boss surprises us or sneaks up behind us, she’ll think that we’re actually working.”
Now, I hope you won’t think me too much of a curmudgeon, but…
* At a recent major IT “expo”, the keynote speaker kicked off the show by saying, “IT lost 100,000 jobs last month but..”
* Far more companies are downsizing than are hiring, and there are now more job seekers-per-job-opening than ever before in history.
* You’re not twelve any more.
* No amount of camouflage or quick Alt-Tab-ing is going to fool your machine’s logs, or the corporate screen-capture “productivity” monitoring software.
However, if you want to see the latest Fool The Boss tools, click here. There’s some new ones on me.
(And.. here’s another thought; maybe your boss saw this article too..)
Copyright 2007-9 © Tech Paul. All rights reserved. post to jaanix
| Share this post : | |
|
|
|
|
|
|
|
|
|
|
How To Hide Your Files*
Sometimes a little privacy is nice. Today I’m going to show you how to hide a folder so that other people who use your machine won’t be able to see it, or its contents.
Tip of the day: Create a hidden folder for your private files. The first thing to consider is where to place the folder. You want it to be someplace you’ll remember easily, and someplace sort of out of the way. Some folks will put it right on their desktop, and there is a certain elegance to the “hide in plain sight” approach, but I’m going to bury it a little… inside my My Video folder (inside My Documents).
Navigate to the place you want to place your hidden folder (in my example, My Documents >My Video) and open it. Now create a new folder. Right-click on any part of the blank area and select “New” from the list of choices, and a new list of choices appear — select “folder”.  Now you will see a folder ready for a new name. I chose to name mine “stuff”, as it is fairly uninteresting and innocuous. If you want to make sure nobody is tempted to look in there, you could name it “efficiency reports 2005”, but you want to avoid an intriguing name, like “private”, “confidential”, “good stuff”, or “collection”.
Now we’re going to make the folder hidden: right-click on your new folder (“stuff” in my example) and select “Properties”. Down towards the bottom is a checkbox labeled “Hidden”. Check it, and click on the “Apply” button.

Now when you navigate back to the My Video folder you will not see your folder. If you do, it should be faded, or “dim”. This means you have your Folder Options set to “show hidden files and folders”. This is normally off, by default; but to undo this setting, look (up) to the Tools menu and click it, and select “Folder Options” (the bottom choice) and then the View tab. 
Make sure the radio button “Do not show hidden files and folders” is selected, and then click on the “Apply to All Folders” button, or the “Apply” button if you only want to affect the My Video folder. Now the folder is invisible. To make it visible again, for when you want to use it, reverse the steps above to “Show hidden…”
Let us say you want to put a password “lock” on the folder to make it even more difficult for other users to look inside (should they locate it somehow). Right-click on the folder and select “Properties” again and click on the Sharing tab.

Place a check in the “Make this folder private” checkbox and click “Apply”. Now the folder is protected with your User Account’s logon password. If you have not implemented a User Account password, you missed the second Tech–for Everyone article ever written — to see it, click here. You will now be warned that there’s no User Account password. 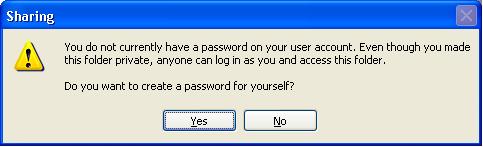 answer “Yes”, and you’ll be taken to the User Accounts control panel.

Since you will have to enter this each time you log onto the PC, I suggest you follow the rules of a strong password (complex), as discussed in the article above (the link) and write it down someplace as well. Now you have a secure — and private — place to keep your personal files. But wait, there’s more!
Today’s free link: Because of the fact that hidden files and folders can be found by someone with a little savvy (like you, now that you know the “Show hidden files” command) and the password protection will only apply to network shares and when the other user have their own User Accounts… if you are sharing your UA (User Account), you need a 3rd-party tool to hide and encrypt the folder(s) you want to keep private. True Crypt is the free solution I recommend.
Copyright 2007-9 © Tech Paul. All rights reserved. post to jaanix
| Share this post : | |
|
|
|
|
|
|
|
|
|
|
Create a hidden folder for your private stuff
Sometimes a little privacy is nice. Today I’m going to show you how to hide a folder so that other people who use your machine won’t be able to see it, or its contents.
I hope all of you had a pleasant and enjoyable holiday weekend.
Tip of the day: Create a hidden folder for your private files. The first thing to consider is where to place the folder. You want it to be someplace you’ll remember easily, and someplace sort of out of the way. Some folks will put it right on their desktop, and there is a certain elegance to the “hide in plain sight” approach, but I’m going to bury it a little… inside my My Video folder (inside My Documents).
Navigate to the My Video folder (My Documents >My Video) and open it. If you have not loaded any video onto your PC, this window will be blank (empty). Now create a new folder. Right-click on any part of the blank area and select “New” from the list of choices, and a new list of choices appear — select “folder”.
Now you will see a folder ready for a new name. I chose to name mine “stuff”, as it is fairly uninteresting and innocuous. If you want to make sure nobody is tempted to look in there, you could name it “efficiency reports 2005”, but you want to avoid an intriguing name, like “private”, “confidential”, “good stuff”, or “collection”.
Now we’re going to make the folder hidden: right-click on your new folder (“stuff” in my example) and select “Properties”. Down towards the bottom is a checkbox labeled “Hidden”. Check it, and click on the “Apply” button.
Now when you navigate back to the My Video folder you will not see your folder. If you do, it should be faded, or “dim”. This means you have your Folder Options set to “show hidden files and folders”. This is normally off, by default; but to undo this setting, look (up) to the Tools menu and click it, and select “Folder Options” (the bottom choice) and then the View tab.
Make sure the radio button “Do not show hidden files and folders” is selected, and then click on the “Apply to All Folders” button, or the “Apply” button if you only want to affect the My Video folder. Now the folder is invisible. To make it visible again, for when you want to use it, reverse the steps above to “Show hidden…”
Let us say you want to put a password “lock” on the folder to make it even more difficult for other users to look inside (should they locate it somehow). Right-click on the folder and select “Properties” again and click on the Sharing tab.
Place a check in the “Make this folder private” checkbox and click “Apply”. Now the folder is protected with your User Account’s logon password. If you have not implemented a User Account password, you missed my very second Tech–for Everyone article; to see it, click here, you will now be warned that there’s no User Account password.
answer “Yes”, and you’ll be taken to the User Accounts control panel.
Since you will have to enter this each time you log onto the PC, I suggest you follow the rules of a strong password (complex), as discussed in the article above (the link) and write it down someplace as well.
Now you have a secure — and private — place to keep your personal files. But wait, there’s more!
Today’s free link: Because of the fact that hidden files and folders can be found by someone with a little savvy (like you, now that you know the “Show hidden files” command) and the password protection will only apply to network shares and when the other user have their own User Accounts… if you are sharing your UA (User Account), you need a 3rd-party tool to hide and encrypt the folder(s) you want to keep private. True Crypt is the free solution I recommend.
Copyright 2007 © Tech Paul, All Rights Reserved.
| Share this post : |  |
 |
|
|
|
|
|
|
|
 |
• About Tech Paul
 I am a Retired computer & network technician. I used to think the machines were pretty cool. Now I don’t.
They’re anything but.
I regularly posted how-to’s and tricks & tips and general computing advice here starting in 2007. (Use the Search tool to find answers. But be aware, many are rather dated.) Sometimes I answered (your) specific questions in an article if I believed the answer was generally helpful to “everyone”. All the writing you see was my own, typos and all. There always is/was an implied “IMHO” in what you see here.
Note: You are responsible for using this blog and its content. I am in no way liable for any losses caused by user error, viruses and/or other malware, hardware or software failure, or any other conceivable reason.
-
Say "thank you!" Buy Tech Paul a cup of coffee (and keep T4E ad free).

-

-

McAfee® Cybersafety Resource Portal, an online help center designed to assist victims of computer crime and provide information on how to avoid becoming a victim.
-


 Subscribe to Tech--for Everyone by Email
Recent Comments
-

-


-
-
Also:

-
-


